
Shrimp and Andouille

This is an easy grill pan recipe with a Louisiana flair that tastes delicious. This recipe does break one of my tips for using grill pans in that I use a lot of honey in the marinade; more on that later.
The shrimp marinade:
• Juice of two limes
• Two tablespoons of hot sauce
• One tablespoon of honey
I peeled and deveined a half pound of Louisiana gulf shrimp, added them to the marinade and let them soak in the refrigerator for an hour. I used small wooden skewers and added one marinated shrimp and one slice of andouille sausage to each skewer. I had a little more shrimp than sausage so I made up a few skewers with two shrimps each.
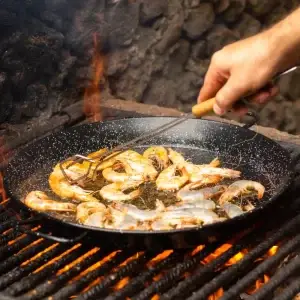
As always, the grill pan was preheated over medium low for about five minutes. The skewers grilled up pretty quickly and smelled great. I didn’t time things exactly but it took about three minutes per side. About 30 seconds before I took the skewers out of the pan I hit everything with a fresh squirt of lime juice.
Really, really good! These make a pretty and flavorful appetizer that is just the right size to munch on with one hand. The hot sauce is not overpowering at all, the citrus was the strongest component.

Okay, now about the honey in the marinade….I knew this was going to leave me with lots of crud on my grill pan so I used my clad aluminum pan instead of my cast iron. I can soak my clad aluminum pan in hot soapy water for a few hours and it cleans up easy. I would never do that with cast iron. I guess that is one of the important things about “rules”; as long as you know why they exist you can go ahead and break them at your discretion. I knew I was going to have a crud covered grill pan to clean before I ever started cooking and so I planned accordingly. No big deal.
Pineapple Ginger Chicken
Hey everyone! I am delighted to share one of my favorite grill pan recipes. This weekend I grilled Pineapple and Ginger chicken breasts and they were simply amazing. The pineapple flavor is mellow and mild while the ginger is very distinct and powerful.
Pineapple Ginger Chicken Breast
I prepared a very simple marinade.
- 1 eight ounce can of crushed pineapple (I prefer Dole since it is packed in pineapple juice)
- 1 knob of ginger, peeled and chopped.
- ½ cup of water
- 1 tablespoon salt

Everything got mixed with my hand blender until the ginger was pretty well broken down. Ginger is so fibrous that it will never get smooth; you just want it broken down and incorporated. I put a whole boneless, skinless chicken breast in a gallon Zip-Loc, poured in the marinade and let it rest overnight in the refrigerator.
The next day I rinsed off the chicken and patted it dry. The chicken got a simple rub of paprika, chili powder and salt. The only reason I applied a rub was to give the chicken some color, all of the flavor comes from the marinade. I let the chicken warm on the counter for about ten minutes and then placed it into my grill pan that had been preheated on medium low for about five minutes. I wasn’t using my cast iron pan so I sprayed in a little Pam before I added the chicken. I placed some new aluminum foil on my brick and placed it on the thick side of the breasts.
Pressing for better grill marks.
Rubbed for a little color.
I grilled the chicken for five minutes then flipped and grilled another five. I then flipped the chicken back over and inserted a thermometer into the thickest part of the breast. The chicken cooked another eight minutes until an internal temperature of 160 was reached (18 minutes total). The aroma of the ginger was incredibly intense the entire time the chicken was grilling.
….and here is the other side!
After five minutes…
Let the meat rest for at least five minutes before slicing to let the juices redistribute. I highly recommend this as a great way to jazz up chicken breasts. I have used this same marinade with pork tenderloin with spectacular results.
Thanks for looking!
Grilled Lady Finger Bananas

I was inspired to make this after reading Grill Pan Cooking. The preparation is really pretty simple and involves slicing Lady Finger bananas in half lengthwise. Hey…easy is good sometimes.

I pre-heated my grill pan on medium for a few minutes and added the bananas to the pan cut side down. After about five minutes I flipped the little guys over and let them go for another few minutes.

One of the things that really surprised me was how black the skin became. I guess I should have anticipated that but….sometimes you just have one of those days.
I plated these up and drizzled with a little honey since they looked a bit dry. The texture held up pretty good and the bananas looked great with real pretty grill marks. So here is the catch…..I made these because I thought it would be fun and would look pretty. These are meant to be served on top of ice cream but to be honest; I don’t like bananas and haven’t eaten ice cream in years. I wish I could tell you that these were delicious and you needed to go make them RIGHT NOW. All I can really say is that this was fun!
Really this was just another excuse to bust out a grill pan and play in the kitchen. Thanks for playing around with me. ![]()
Here is a much better post on grilled bananas.
Here is another link for a Meal Planner you might find interesting.
Jerk Chicken
Jerk Chicken
Jerk Ingredients
- ½ tsp ground allspice
- ½ tsp ground cloves
- ½ tsp ground ginger
- ½ tsp ground garlic
- ½ tsp brown sugar
- ½ tsp lemon pepper
- 1 small yellow onion, diced
- 1 small habenero pepper, stemmed, seeded and chopped
- Juice from one lime
- 1 Tbs vegetable oil
- 1Tbs soy sauce
Everything was added to a small food processor and pulsed until a smooth paste was obtained. I put a whole boneless, skinless chicken breast (1.5 lbs) in a one gallon Ziploc bag and poured in the jerk paste. The paste was massaged onto the chicken and rested in the refrigerator overnight.
The next day I took the chicken out of the marinade and used paper towels to dry it off. I wanted to remove the moisture from the surface, not the seasonings, so I just gently pressed paper towels onto the meat.
Dried and ready for the grill.
I preheated my grill pan for five minutes on medium heat and then added the chicken. One of the tricky parts about cooking chicken breasts is that they are extremely uneven. One side is very thick and cooks slower than the slender end. By the time the breast is done in the thickest part it is often overcooked and dry everywhere else. My approach to this problem is to bring out my old foil wrapped brick and use it as a press on the thick part of the breast. This helps the thick part cook faster while laying down some excellent grill marks at the same time.
Press the thick side of the breast for even cooking.
I grilled the chicken for six minutes, flipped and grilled the other side for six minutes. When I flipped the chicken I also flipped the brick as I didn’t want the side that had been in contact with the raw chicken to come into contact with the cooked chicken. After twelve minutes the internal temperature of the thick part of the breast was 150 degrees. I flipped the chicken and cooked for another three minutes then flipped and cooked for another three. After 18 minutes of grilling the chicken was at 160 degrees and perfectly cooked. Great grill marks and very juicy all the way through.
Grilled to perfection!
You can serve this as an entrée for two or you can slice it up and use as a topping for just about anything. I ended up making a salad for one meal and some tacos for another.
Jerk Chicken Salad
I am going to change up my jerk paste the next time I make this. This will be better using fresh ginger and garlic instead of powdered. I will also use a large habenero instead of a small one as the heat level was much lower than I expected.
By the way, if you make this recipe be sure to throw away the foil on your brick after you are done cooking.
Grill Pan Sweet Potatoes
Grilled Sweet Potatoes
This is a super easy but impressive side dish that takes about twenty minutes to grill. If you don’t care about the grill marks this recipe also works well by roasting in a 350 degree oven for about forty minutes.
Trim the ends from two sweet potatoes and peel. It helps if the potatoes are roughly equal in size and uniform in appearance. Some sweet potatoes have all kinds of gnarly and funky shapes which makes them a pain when you are trying to get relatively uniform wedges. Cut the potatoes in half lengthwise and then cut each half into three or four wedges.
Cut into wedges and season
Get even shaped potatoes
Lightly coat the wedges with some vegetable oil and then sprinkle with kosher salt, black pepper and freshly chopped rosemary. Heat you grill pan over medium heat for five minutes then add the potato wedges to the pan. Turn the wedges every five minutes until grilled on all sides and fork tender.
Grill five minutes per side then turn..
Remove the wedges from the pan and while still hot add a few pats of butter for a nice shine. If you like to sweeten your potatoes you could always add a little brown sugar, honey or maple syrup at this point as well. I skip this step as a the butter and rosemary suits me just fine.
Grill Pan Pork Chops
Grilled Chops!
I had fun with some pork chops the other day. There is nothing groundbreaking in the recipe but this did serve as a great lesson in using my grill pan.
I started out with four boneless pork chops that were a little under an inch thick. I let the chops brine for about an hour. I wanted to let them soak for four to six hours but I just didn’t have the time. I dried the chops off, gave them a light coat of mustard and a good dusting of Stubb’s BBQ rub. I am a big fan of using a light mustard coating on pork. Mustard and pork are a great combination and the mustard layer really helps the rub adhere to the meat. The mustard flavor in the end product is actually much more subdued than you would expect.
Boneless chops destined for the grill pan.
Painted with some mustard…..
Into the pan!
I pre-heated my cast iron grill pan for five minutes over medium heat. I was able to fit all four chops into the pan without them touching and I let them grill undisturbed for seven minutes. After seven minutes I flipped them over and, “ta-da”, they looked pretty dang boring. They had a few grill marks on them but absolutely nothing to brag about.
Not exactly what I had in mind!
I wanted to make sure I had some great grill marks so I brought out my foil covered brick and placed it across the chops. As soon as the brick went on you could hear the chops really start to sizzle.
When all else fails, break out the brick!
I wasn’t overly concerned about the chops drying out while they were being pressed since they were pretty thick and had been brined a little. After three and a half minutes I rotated the brick 45 degrees to make sure all four chops got pressed evenly and grilled another three and a half minutes. After seven total minutes of pressed grilling I flipped the chops over and had perfection! Check out those grills marks; they made me very happy! The difference between pressed and non-pressed was night and day.
That’s more like it!
I served these up with a little steamed broccoli and a side of rice. Leftovers were enjoyed the next day in the form of pork tacos.
The chops did end up a little overcooked. I suspect this is because I did not get to brine them as long as I wanted, fourteen minutes of grilling was a little too long, and that pressing the chops multiplied the effects of the first two issues. This was a great learning experience for me; I’ll fix my mistakes next time. Just to be consistent and on theme here; a grill pan is a great way to cook a lean protein like boneless pork chops. There was almost no smoke and cleaning up the pan was a snap.
Worth the work.
Pork Tenderloin
Okay, after a few posts on eggplant, mushrooms and tofu it’s time to get back to being a carnivore. This post was an experiment with pork tenderloin. I love this cut; it’s the perfect size, grills easy and marinates extremely well. I have a guilty confession to make; I really like the pre-marinated tenderloins that are showing up quite often these days. The downside of the pre-marinated tenderloins is that two of the primary ingredients in the marinade are dextrose and malto-dextrose, that is, sugar. I knew going into this that this guy was going to smoke up the kitchen and dirty up my grill pan. That’s alright; things have to get messy every now and then.
So the cook was pretty straight forward. I pre-heated the grill pan on medium low for about five minutes then added the tenderloin which I had let warm on the counter for the previous thirty minutes. I grilled it for seven minutes per side on four sides for a total of about 28 minutes of grilling. Yep…the kitchen got smokey. I turned my vent on high and opened up the back door, no big deal. I let the finished loin rest for ten minutes then sliced thinly. You can see there is still plenty of pink in the pork which, in my opinion, is just about perfect. After the pork was sliced I gave it a light glaze with a 50:50 mix of Sweet Baby Rays BBQ sauce and honey. I know I am biased since I like my own cooking but let me say that this was fantastic.
While the loin was resting I took a few minutes to go ahead and clean my pan as some crud had built up from the sugary marinade. I added a little bit (maybe two tablespoons) of hot water to the pan and let it steam up the crud. You have to be careful here as you do not want to get a steam burn on your hand. After the steam had died down I gave the pan a quick scrub with my bristle brush and let the pan sit while we ate. I came back after dinner and finished rinsing out the pan. A quick wipe down and a squirt of oil later and the pan was nice and clean then tucked away for another day.
Another note on cleaning, I am adding a small amount of hot liquid to my hot grill pan. I am not adding a large amount of cold liquid. If you pour a lot of cold water into a hot pan you run the very real risk of cracking or warping the pan due to thermal shock. That would be bad.
If you are looking for ideas or equipment check out my page on grill pan starter sets!
Posted under Grill Pan Recipes, Stovetop Grill.
Grilled Veggies
I had some leftover marinade from my grilled tofu post and decided to use it up with some grilled vegetables. I wanted to give eggplant another try and I found some portabella mushroom slices that looked fantastic. Let me start by saying that half of the mushrooms were indescribably fantastic, the other half were okay and the eggplant was a complete and total failure.
Eggplants mock me.
I tried peeling the eggplant this time but it didn’t really matter as I believe my eggplant was doomed from the start. I tried to find a bright, shiny purple eggplant because I figured it would make for good pictures. I didn’t have any luck and as you can see the one I got was pretty dull. After peeling it quickly started turning brown and looking unpleasant. (I know this doesn’t affect the flavor but it sure as heck doesn’t help either!) When I sliced it I saw it had a heck of a lot more seeds than the last one I grilled. The slices were marinated for about thirty minutes and then grilled along with some mushrooms for about ten. The end product was extremely pretty but was absolutely inedible. I have to believe this was the result of an eggplant past its prime.
The mushrooms offered quite a different story. Like the eggplant, the mushrooms were marinated for about thirty minutes before heading into the grill pan. They took up some nice marks and smelled great while they were grilling. I let them go for about four minutes a side (heat at medium low) and that seemed just about right. I cooked the mushrooms in two batches. I wanted the second batch to have a little gloss for a better picture so I brushed them on both sides with some melted butter towards the end of grilling. The difference the butter made was unbelievable! In addition to making things look prettier it took the mushrooms from “Okay” to “I can’t stop eating these dang things!” I will be eating a lot more portabellas.
Just trying to be helpful here..adding a few links to some folks who have had better luck with grilled eggplant than me!
Grilled eggplant and goat cheese
If you are looking for ideas or equipment check out my page on grill pan starter sets!
Posted under Grill Pan Recipes, Vegetable Recipes.
Grilled Tofu
Another great lean protein for the grill pan is tofu. Plain tofu is pretty dang boring; not much to look, mushy texture and not much flavor. I jazz it up by hitting it with a pretty strong marinade overnight for flavor and color. For extra color and a bit of contrasting texture I grill it. The grill marks are a nice visual contrast and they add a little bit of crunch to the surface. I have a little video of the process at the bottom of this post.
Grilled Tofu
In order to get the marinade to do much good you have to get some water out of the tofu. I do this by pressing the tofu with a brick for a few hours. After pressing the tofu gets cut into half inch slices and covered in Stubb’s Chicken Marinade in the refrigerator overnight.
Pat the tofu dry and add it to a pre-heated grill pan. It only takes about two and a half minutes per side to heat through and get some nice marks.
I ate these plain as shown above. These would be excellent on top of a warm rice salad or drizzled with dressing and served with some grilled green beans. You get the idea…I’m not the most creative person in the world, I’ll leave that part to you. What else would these be good with?
Here are some other takes on grilled tofu:
If you are looking for ideas or equipment check out my page on grill pan starter sets!
Posted under Grill Pan Recipes, Random Grill Pans, Stovetop Grill, Vegetable Recipes.
Grilled Eggplant
Eggplant is something I have struggled with for a long time. I really want to like eggplant but so far I have not been successful. I won’t bother with a detailed listing of my eggplant failures but suffice it to say that they have been numerous. However, I am nothing if not persistent and so I decided to give my purple nemesis another try.
One great attribute of eggplants is that they take to the grill very well. Indeed, eggplant might be the ideal grilling vegetable. It is easy to slice seven or eight half inch “steaks” from a mature eggplant making it a cinch to use one plant for an appetizer course. The firm slices hold up very well to the heat of a grill and, if you are grilling outdoors, are large enough that they won’t slip through the grate. The white flesh of the eggplant is an ideal canvas for grill marks which will develop beautifully over the ten minutes or so that the slices are on the grill.
I made up a basic marinade for my eggplant slices from equal parts canola oil and red wine vinegar with some roasted garlic, salt, pepper and paprika thrown in. There are undoubtedly much better marinades for eggplant out there and if anyone would like to share theirs I would love to give it a try! I let the slices soak for about thirty minutes at room temperature and then patted them dry. I let my cast iron grill pan pre-heat for about five minutes over medium heat until a few drops of water sizzled as soon as they hit the pan.
I grilled the eggplant for five minutes on each side and took the opportunity to do a demonstration on grill marks. After the slices had been in the hot grill for three minutes I rotated them ninety degrees and grilled for another two minutes to get the classic cross hatch pattern. You can see that the pattern is present but rather weak.
Grilled Eggplant
I then flipped the slices and let them grill another five minutes without moving them. You can see that the sides that got the full five minutes of undisturbed grill contact have much sharper grill marks.
Grilled Eggplant
In order to get the best of both worlds, a highly defined cross hatch, I find I have to grill something for about eight minutes on a side; four minutes of grilling, rotate 90 degrees and another four minutes of grilling. I then will flip my food to let it finish cooking. Unfortunately for most foods this results in food that is over cooked on one side.
So how did the eggplant turn out? It was okay; nothing spectacular but definitely a step in the right direction. I might try peeling it before grilling next time. I will also cut back on the vinegar content of my marinade and add some herbs. Any other suggestions?